
In our project we want to create custom components which we want to use in the JavaFX Scenebuilder.
Anything you need could be found on my gibthub : Scavenger156-Gibthub
At first we think that the current importing of a „.jar“ file is more than enough.
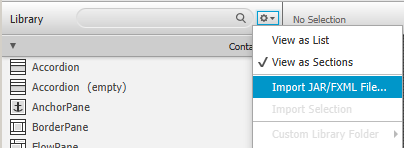
There are some problems:
- every developer must import the jar every time it was changed
- a developer could forget to add the file
- every time he opens a „.fxml“ with custom components he must add the „.jar“
- if you import the „jar“ you also need all referenced library’s to let it work
- no live development on the custom components
But after all these problems we need a change and this was where i come in to the game.
My goal was to create a extension of the existing scenebuilder.
Part 1: Own Project
1. Create a new Java-Project
2. Download & install the latest version of the JavaFX-Scenebuilder
3. open the „app“ directory 
3. Copy the following files.

3.1 your final structure could be
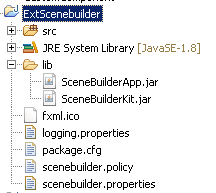
4. Add the „SceneBuilderApp.jar“ and „SceneBuilderKit.jar“ to the classpath
5. Create a custom „Main“-class
[codesyntax lang=“java“]
package eu.thecreator.scenebuilder;

import javafx.collections.ObservableList;
import javafx.stage.Stage;

import com.oracle.javafx.scenebuilder.app.SceneBuilderApp;
import com.oracle.javafx.scenebuilder.kit.fxom.FXOMDocument;
import com.oracle.javafx.scenebuilder.kit.fxom.FXOMInstance;
import com.oracle.javafx.scenebuilder.kit.library.LibraryItem;

import eu.thecreator.components.MyComponent;

/**
 * Overriding the existing Scenebuilder
 *
 * @author andre
 *
 */
public class Main extends SceneBuilderApp {


	/**
	 * Main
	 *
	 * @param args
	 */
	public static void main(String[] args) {
		launch(args);
	}

}
[/codesyntax]
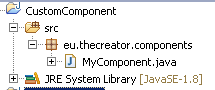
Part 2: The custom component
1. We create a custom component in a second project with a custom component
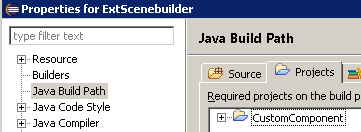
2. Add the new project to the buildpath
Part 3: Adding the custom component into the scenebuilder
After part 2 we can use the project in our scenebuilder without adding the „.jar“ every time and we need no path to the „.jar“ in the „fxml“-files.
1. How to add the new component?
This was the main question because there was no sourcecode or any tutorial to add a custom block to the library.
So i used a decompiler and a little magic 😉 to do this:
[codesyntax lang=“java“]
ObservableList<LibraryItem> items = SceneBuilderApp.getSingleton().getUserLibrary().getItems();

Class<?> componentClass = MyComponent.class;

LibraryItem item = new LibraryItem(componentClass.getSimpleName(),
	CUSTOMLIB_NAME,
	"" // The parameter could not be "null" otherwise
	// drag and drop would not work
	, null, SceneBuilderApp.getSingleton().getUserLibrary()) {
	@Override
	public FXOMDocument instantiate() {
		FXOMDocument document = new FXOMDocument();

		FXOMInstance in = new FXOMInstance(document, componentClass);
		document.setFxomRoot(in);

		return document;
	}

};
[/codesyntax]
2. Creating the final version
[codesyntax lang=“java“]
import javafx.collections.ObservableList;
import javafx.stage.Stage;

import com.oracle.javafx.scenebuilder.app.SceneBuilderApp;
import com.oracle.javafx.scenebuilder.kit.fxom.FXOMDocument;
import com.oracle.javafx.scenebuilder.kit.fxom.FXOMInstance;
import com.oracle.javafx.scenebuilder.kit.library.LibraryItem;

import eu.thecreator.components.MyComponent;

/**
 * Overriding the existing Scenebuilder
 *
 * @author andre
 *
 */
public class Main extends SceneBuilderApp {

	private static final String CUSTOMLIB_NAME = "Customlib";

	/**
	 * Main
	 *
	 * @param args
	 */
	public static void main(String[] args) {
		launch(args);
	}

	@Override
	public void start(Stage arg0) throws Exception {
		super.start(arg0);
		postLoad();
	}

	/**
	 * Adding our own code
	 */
	private void postLoad() {
		// These are the current items of the library
		ObservableList<LibraryItem> items = SceneBuilderApp.getSingleton()
				.getUserLibrary().getItems();
		if (items.isEmpty()) {
			// The items are not loaded so we try again later
			javafx.application.Platform.runLater(new Runnable() {

				@Override
				public void run() {
					postLoad();
				}
			});
			return;
		}

		// adding our Components
		items.add(addComponent(MyComponent.class));

	}

	private static LibraryItem addComponent(final Class<?> componentClass) {
		LibraryItem item = new LibraryItem(componentClass.getSimpleName(),
				CUSTOMLIB_NAME,
				//
				"" // The parameter could not be "null" otherwise
				   // drag and drop would not work
				, null, SceneBuilderApp.getSingleton().getUserLibrary()) {
			@Override
			public FXOMDocument instantiate() {
				FXOMDocument document = new FXOMDocument();

				FXOMInstance in = new FXOMInstance(document, componentClass);
				document.setFxomRoot(in);

				return document;
			}

		};
		return item;
	}
}
[/codesyntax]
3. Now start the new „main“ and see the new what we could do:

The scenebuilder also finds the property’s in our new component 🙂
4. Save your file and be happy.
[codesyntax lang=“xml“]
<?import eu.thecreator.components.*?>
<?import java.lang.*?>
<?import javafx.scene.layout.*?>


<AnchorPane maxHeight="-Infinity" maxWidth="-Infinity" minHeight="-Infinity" minWidth="-Infinity" prefHeight="400.0" prefWidth="600.0" xmlns="http://javafx.com/javafx/8" xmlns:fx="http://javafx.com/fxml/1">
   <children>
      <MyComponent diameter="30.0" height="127.0" layoutX="131.0" layoutY="110.0" width="322.0" x="10.0" y="10.0" />
   </children>
</AnchorPane>
[/codesyntax]
Anything you need could be found on my gibthub : Scavenger156-Gibthub